ProtocolAnalyzer Manual
Settings
The settings dialog can be reached from the tool bar or via the menu view→Settings…. The settings are groupt in three tabs: General Settings, Audio Settings and CUL Settings.
General Settings
| Field | Explanation |
|---|---|
| Signal Source | Select which source of data signal to use |
| Audio | Use audio input as signal source |
| CUL | Use a CUL-device as signal source |
| Pronto Settings | Pronto is a format for describing raw pulse signals. These settings affect how this format is generated |
| Frequency | Pronto encoding contains the IR modulation frequency. We have no decoders that actually detect this frequency, so here we specify which to use when Pronto messages are decoded. Default is 40000 Hz |
| Lead Out Time | The Pronto decoder needs to know how long silence should be counted as the end of a signal. If the protocol has very long pulse spaces within a message this may have to be extended from the default 9000 micro seconds. |
Audio Settings
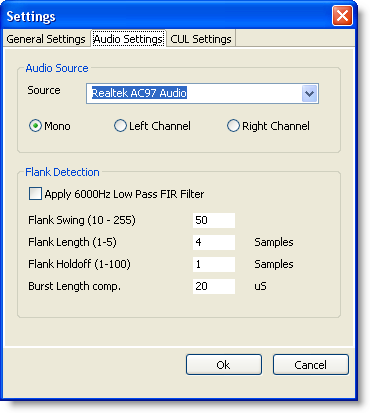
When Audio input is used, the ProtocolAnalyzer constantly samples the analog input signal, trying to recreate any digital pulses found in the signal. The so called flank detector uses a quite simple algorithm to find the flanks of the pulses:
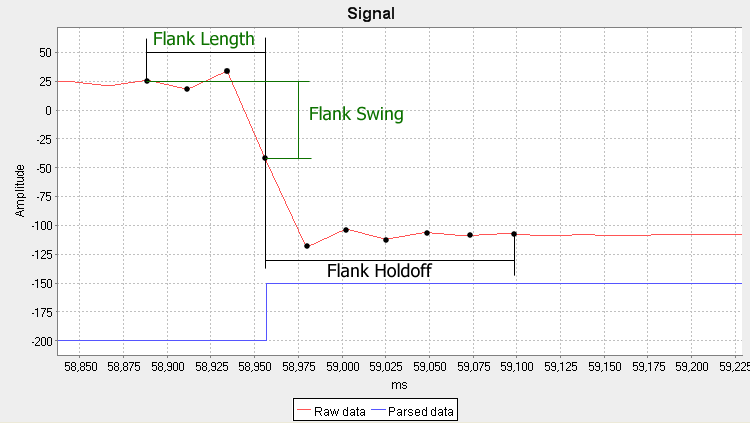
Find sequences where the sampled value changed significanlty (Flank Swing) over a short period of time (Flank Length)
To avoid the same flank being counted twice if it is large, we wait a while (Flank Holdoff) after finding a flank until we accept a new flank. This picture shows the meaning of the settings on a real sampled signal. The red line is the analog value (where the sample points are marked with black dots). The blue line is the flank detectors interpretation of the signal:
In the example Flank Swing was set at 50 and Flank Length set to 3, so when the signal changed more than 50 over 3 samples, the flank was detected (see the blue line). Note that the signal changed more than 50 in the following samples as well, but since this was within Flank Holdoff, this was not counted.
The parameters of the flank detector are configured in the Audio Settings Dialog. The NetHomeServer uses the same flank detector, so the settings you find good here can be used in the the NetHomeServer as well.

| Field | Explanation |
|---|---|
| Audio Source | In this group you specify which audio source to take the input signal from |
| Source | Here you select which sound card and input device to use |
| Mono | Only one channel used. This is usually the best setting when using the microphone input, since most sound cards only have one microphone channel |
| Left Channel | Use the Left audio channel |
| Right Channel | Use the Right audio channel |
| Flank Detection | Settings for the flank detector (see text above) |
| Apply … Filter | If the input signal contains a lot of noise, a digital low pass filter can be applied to the signal before flank detection. This Smooths out the signal. You may have to increase Flank Length when this is used |
| Flank Swing | The hight of a change needed to count as a flank. Use about half the actual height observed in the raw view |
| Flank Length | How many samples needed to perform the flank |
| Flank Holdoff | How many samples after a detected flank we should wait until trying to find a new one. Can usually be set to 1 |
| Burst Length comp. | Many receivers of RF and IR signals are a bit “slow” in detecting the start of a mark pulse (burst). The result is that mark pulses are detected as a bit shorter then they are and space pulses a bit longer. This setting can compensate for this behavior |
CUL Settings
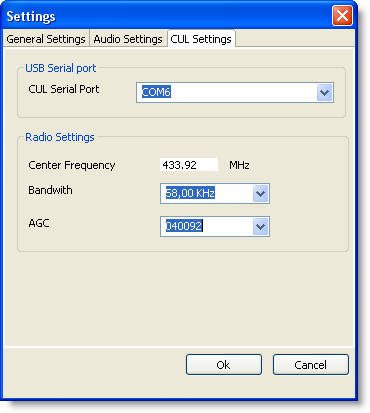
The CUL device is a programmable RF-transceiver on a USB stick. See www.busware.de for details on the device.
| Field | Explanation |
|---|---|
| USB Serial Port | The CUL Device is presented to the OS as a serial port |
| CUL Serial Port | Select the CUL Serial Port |
| Radio Settings | Here some of the parameters of the programmable receiver can be modified |
| Center Frequency | This is the reception radio frequency. 433.92 is the center of the radio band used by most remote lamp switches. This is also the frequency that the antenna is tuned for |
| Bandwith | This is the bandwidth of the reception filter |
| AGC | The settings for the Automatic Gain Control. Refer to the CUL device for details on this |


